
Non-fungible tokens (NFTs) are changing the way artists sell and trade their work, with a growing number of collectors looking to invest in these digital creations. But with selling anything, you need a store, and it is no different on Mintable.
A store is a part of how a seller presents a selection of goods and offers to trade or sell to customers. Your NFTs are goods that are being sold on the marketplace, and they need to be stored and presented somewhere customers can have easy access to – that somewhere would be a store.
Mintable store vs creating your own store
A store used to list and sell your NFTs is essentially a smart contract on the blockchain. On Mintable, there are two types of stores for which you can mint your NFTs – on the Mintable store (this doesn’t cost gas), or on your own store. When you choose the Mintable gasless minting option, you will be creating your item using the Mintable smart contract. When you create your own store, you are deploying a smart contract onto the blockchain. This store will have its own unique address, for your unique items.
How do I create a store?
First, you will need to be a registered user on our platform. Once you’re a user, it’s easy to create a store on Mintable. We’ve outlined 6 steps in this article for getting you your own store on our platform.
Step 1: Go to https://mintable.app/createstore
Click on “create a store” in the top right of the page. Do note that you will need to be registered as a user to create a store.
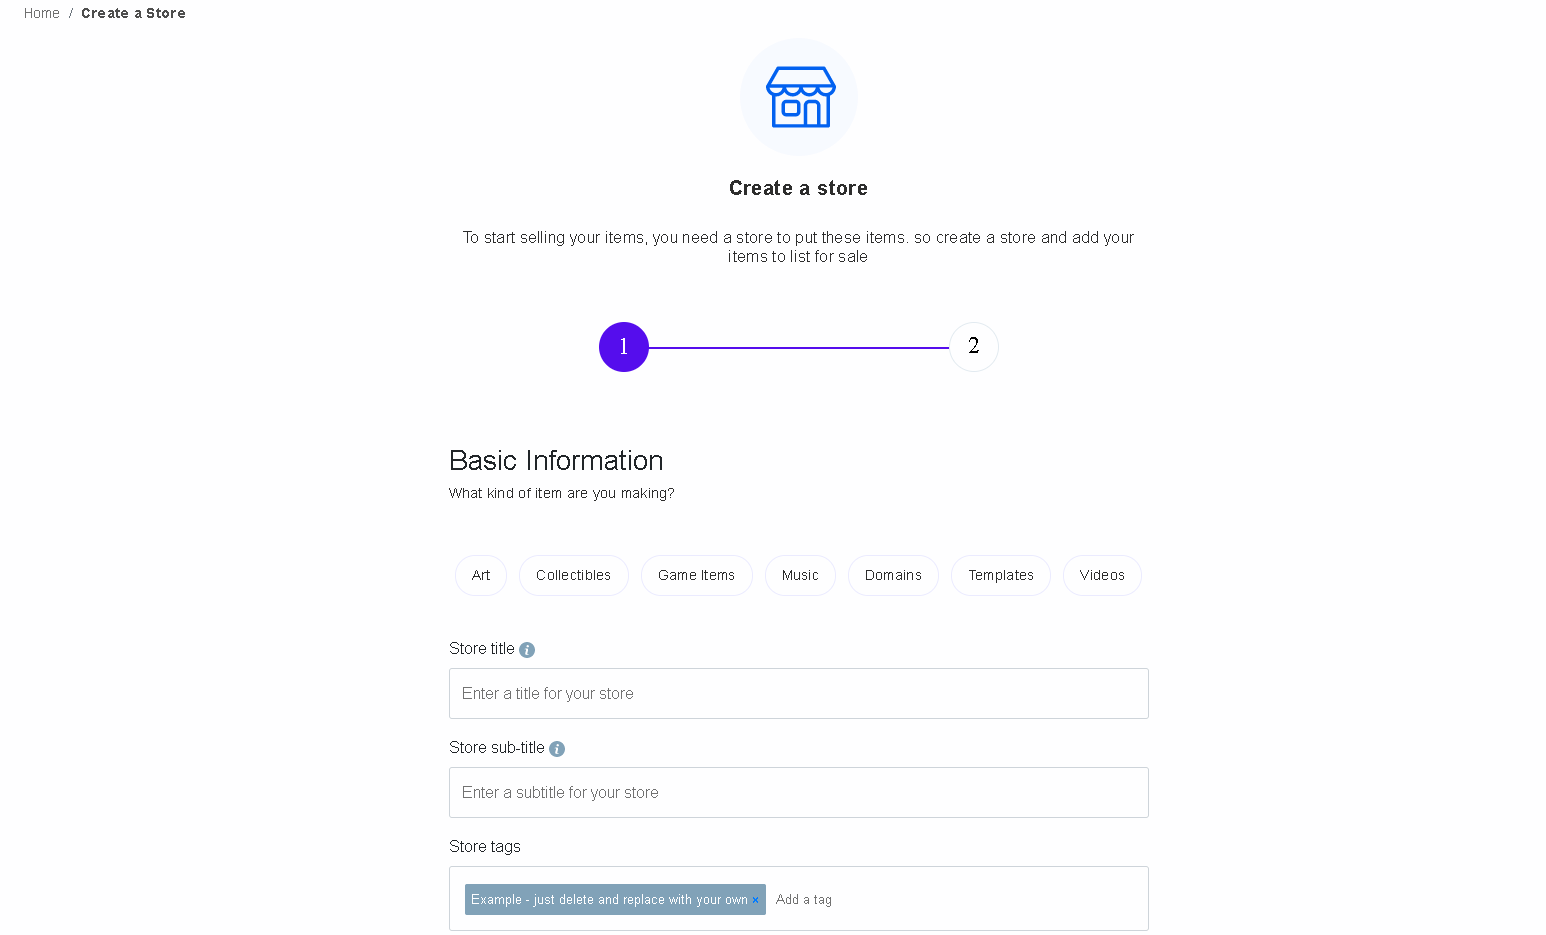
Step 2: Fill in the key details
Once you get to the “create a store” page, you will have to fill it in with the details of how you wish your store to be.
Category
A category is the type of item you wish to sell. It’s how buyers will be able to filter through stores to find your work. If you are selling art, picking artwork would be the category most suited for you. For music, it would be music, and so on.
Title
This is the title of your store. It is the name of your smart contract and will be displayed everywhere.
Subtitle
The subtitle of your store is for any extra information you want to tell customers about your store.
Tags
Tags tell users what your store is about and are used when people search for items and stores.
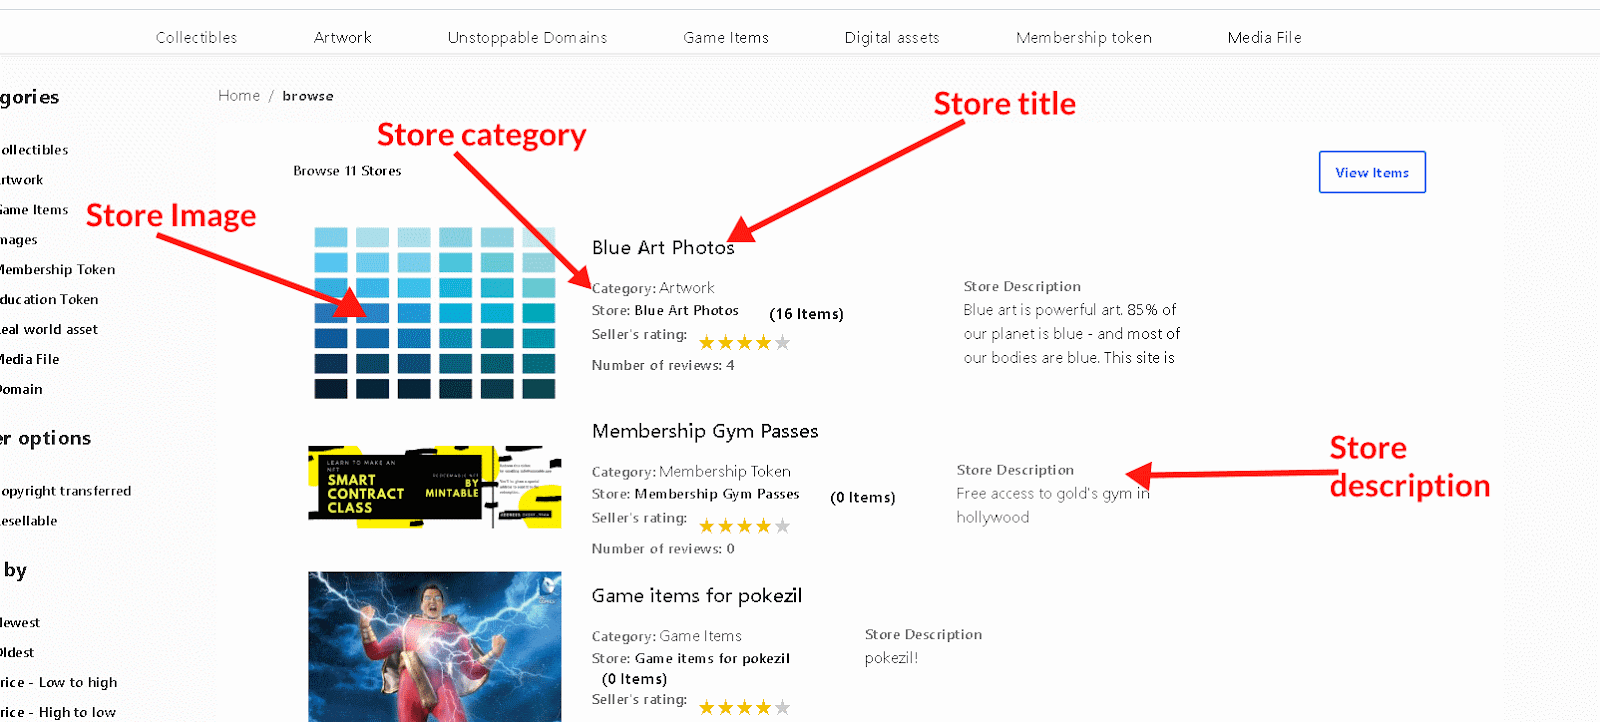
Cover Image
A cover image is something like the storefront of a traditional brick-and-mortar. It is what is displayed as the image for your store. A good cover image is a key component for how attractive your store will look.
A recommended Store Image size is 1450px x 250px Do avoid having text on the image as the system will auto-resize it depending on the device users are viewing on.
Description
This is your chance to capture the attention of your buyer. Be as descriptive as possible and tell them more about your store and the items you will be selling from it.
Here are some tips for how to write a good description: https://editorial.mintable.com/2021/09/04/nft-descriptions-dos-and-donts/
Step 3: Fill in extra details – Batch Minting and metadata storage
Metadata Storage
This is where you would like to store your data. This location is stored on the smart contract and cannot be changed after you’ve created your store.
Read more about metadata here: https://editorial.mintable.com/2021/08/09/nft-metadata-whats-all-this/
Mintable offers 3 options:
- Mintable: store your data with us – the easiest solution
- IPFS: store your data on IPFS – the decentralized solution (If you choose to use IPFS for your metadata, you won’t be able to batch mint.)
- My own servers: store your data anywhere else, on your website/server, arweave, filecoin.
Batch Minting
Batch minting is a Mintable minting option that allows you to mint multiple tokens in a single transaction. This minting option is for creators who are looking to create a series or a collection. It allows you to save on those pesky gas fees – rather than making 50 transactions and paying gas fees each time, batch minting allows you to mint a larger number of items and pay gas fees just once.
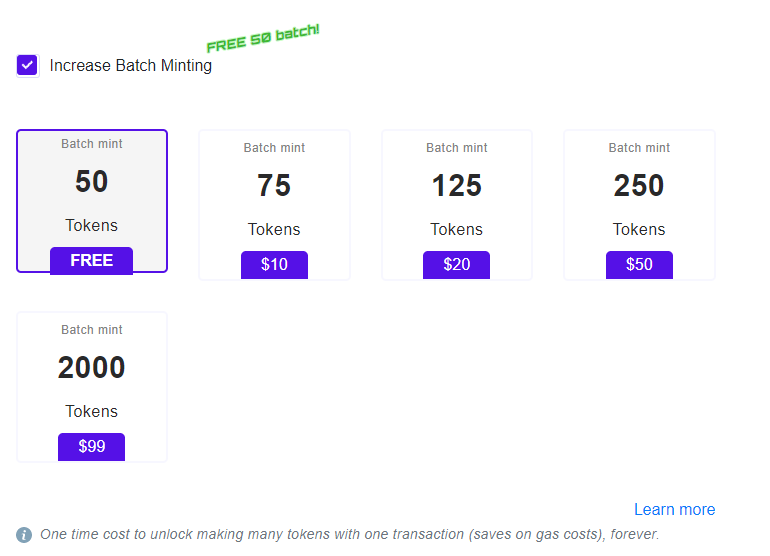
When you create a new store, Mintable offers a free batch mint of 50 items.
Read more about gas fees and the difference between gasless minting and advanced minting options like batch minting: https://editorial.mintable.com/2021/10/13/gasless-vs-traditional-a-guide-to-mintables-minting-options/
Step 4: Choose your royalty percentage
Toggle the percentage for royalties in this step to set how much you want to receive for the resale of your item.
Step 5: Submit your transaction
Confirm that all the information you’ve submitted is correct and submit the transaction that will create your store as a smart contract on the blockchain.
Step 6: Create your items in the store
After your transaction is finished, start creating the items that you want in your store.

Congratulations! Now that you have your own store, you can get to selling your creations!
If you need more help with creating your store, here is a step-by-step video guide from the founder of Mintable, Zach Burks: https://www.youtube.com/watch?v=JDYBP2CrOIo